T-SIM V4.5 Reference
Example 1: Simple negative forming
| Back to Tutorial | Next Example |
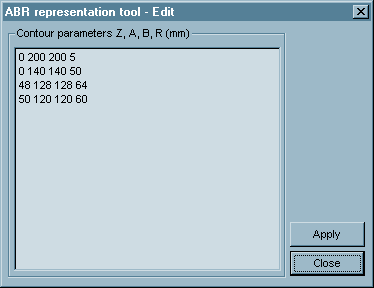
Each line in the dialog specifies z level of a contour, its dimensions
and radius in corners. Contours are created along z axis, i.e. center
of any contour is [0, 0, z]. This must be taken into account when creating
a sheet - the center must have coordinates [0, 0, 0].
Click Create. The new tool created appears on the screen:
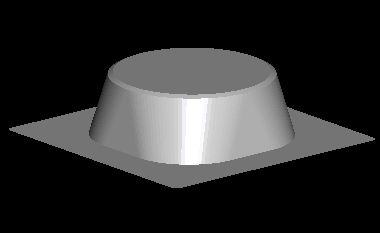
Click File / Save and save the tool into "\Negative" folder under Negative.tol name.
Creating the grid (sheet) representation
Dimensions of any sheet should be equal or smaller than x and y dimensions
of the tool. When the dimensions of a sheet are bigger the sheet can
inflate during simulations without any restrictions and it can lead
to instabilities.
The sheet is always created in x-y plane with z coordinate equal to
zero.
The simulated part has a quarter symmetry. So it is not necessary to
solve deformation of the whole sheet. It is enough to create just one
quarter of the sheet.
To create the sheet representation in T-SIM, just click New Sheet on
T-SIM shortcuts bar. Create new grid (sheet) representation dialog appears.
Please fill in the dialog as follows:
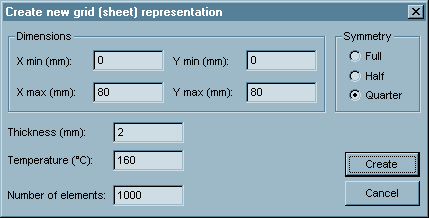
Do not forget to select "Quarter" as a
symmetry type for the sheet.
Click Create. The new sheet appears on the screen:
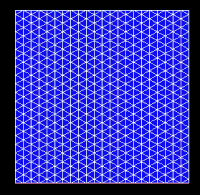
Click File / Save and save the grid (sheet) under Negative.bcs name. Again, use "\Negative" folder.
Process control
In this case the tool (mold) does not move. Only a pressure is applied to inflate the sheet.
Click New Process Control on T-SIM shortcuts bar. Fill in the table with the following time and pressure values:
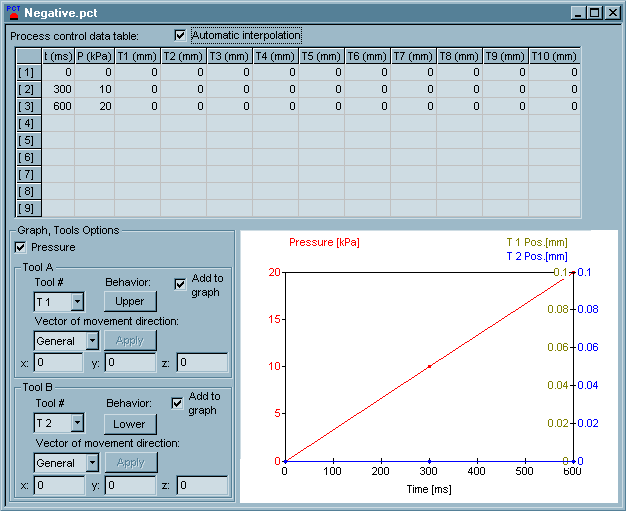
You do not have to specify positions of tools - in this example, the tool 1 does not move and the rest of tools is not used.
Now, make sure the Tool 1 is selected in Tool A group and click on the button below the text "Behavior" to change the Tool 1 behavior to Upper. This is to ensure the sheet will stop on mold walls during inflation. For more information see Reference - Process control - Tool behavior.
Remark: Tool 1 as stored in the Negative.tol file is in the position where it has to be during whole process. If a tool used for a simulation is not in its required positions, open it using Open Tool and then move it using command Tool / Move. For detailed information see Reference - Tools .
Click File / Save and specify a file name for process control data (Negative.pct). Use "\Negative" folder to save the file. After the saving click File / Close to close Process Control window.
Heat & friction
In this case default values are used. Click New Heat & Friction on T-SIM shortcuts bar.

In "Tools" group, only data for Tool 1 must be specified. The rest of tools (T2-T10) is not used in this example. When T1 is selected in "Tool#" combo box, enter temperature, heat transfer coefficient and friction coefficient and then click on Apply changes... button.
In "Ambient air", specify ambient air temperature and heat transfer coefficient between air and material.
Click File / Save and specify a file name for heat & friction data (Negative.pct). Use "\Negative" folder to save the file. After the saving click File / Close to close the window.
For information about values of heat transfer coefficients and friction coefficients please see Reference - HFR.
Setting up the project
To set up a project click New Project on T-SIM shortcuts bar.
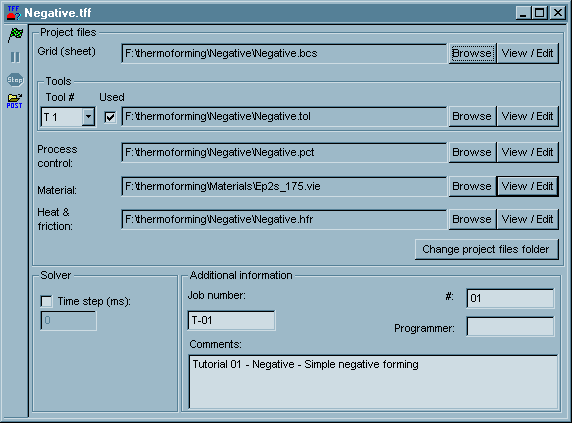
Use Browse buttons to select:
| Sheet | Negative.bcs |
| Tool 1 | Negative.tol (to selecting the tool 1, make sure Tool 1 is selected in "Tools" group, then check the checkbox "Used" and in File Open dialog, browse for the tool file "Negative.tol") |
| Material | Ep2s-175.vie (in this example PP from T-SIM material database is used - stored directory \Material) |
| Process control | Negative.pct |
| Heat & friction | Negative.hfr |
Specify more details about this project in Additional information (optional).
In Solver group, leave "Time step" checkbox unchecked. (This forces T-SIM to use automatic time step estimation.) To keep a fixed time step, check the check box and specify the time step value (typically 1 - 100 ms).
See also Reference - Project.
Click File /Save to save the new project. Specify the project name (Negative.tff). When the project is saved, click Project / Solve to start the project simulation. Within short time the project is solved and you can view results in post processing - just click on Project / Open for post processing. To learn more about post processing please see Reference - Post processing.
| Back to Tutorial | Next Example |