T-SIM V4.5 Reference
Tool
The tool representation can be created within T-SIM when using the built-in tool editor or imported from an external file (STL, DXF, Patran or VRML).
To create a new tool representation, click on the icon with the tool tip "New tool" on T-SIM shortcut bar or click on File / New and select T-SIM Tool as the document type and click OK.
The following dialog appears:
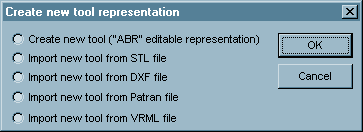
In this dialog box, select the way how the new tool will be created and click on OK. Depending on the selection, continue with Creating new tool using T-SIM ("ABR" editable representation) or Import from STL, DFX, Patran or VRML.
Creating new tool using "ABR" editable representationT-SIM enables creating tools via series of 2-D contours, each representing a cross-section through the tool. The series of contours are stacked parallel to each other in the increasing Z-axis direction and are thus perpendicular to the Z-axis. The shape of a 2-D contour is defined by rectangle dimensions Ai, Bi and radius Ri (see below).
Two subsequent contours can have the same Z-coordinates; the program will automatically check for non-zero areas in the created tool faces. When entering the data points for the tool which is used as a mold, care should be taken to ensure that the face contained in the Z=0 plane should contain an opening to serve as the entry face through which a deforming sheet will enter the tool cavity. The last contour is automatically closed.
Click on File / New and select T-SIM Tool as the document type. Click OK. The following dialog appears:
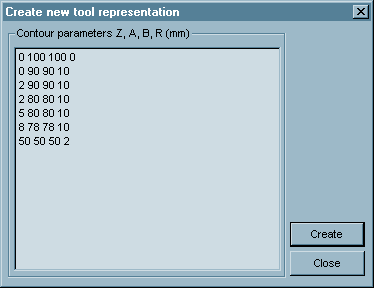 |
0 100 100 0 0 90 90 10 2 90 90 10 2 80 80 10 5 80 80 10 8 78 78 10 50 50 50 2 |
In the dialog box the following items have to be input:
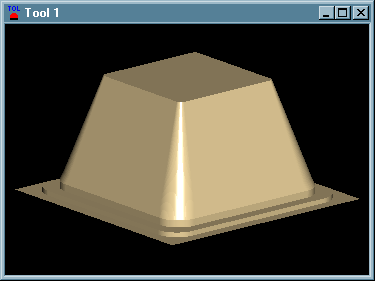
Repeat the above procedure for the remaining contours. Click Save. The tool representation is automatically created and opened for further modifications:
Now, it is possible to click on Tool / Edit command and modify the entered tool parameters:
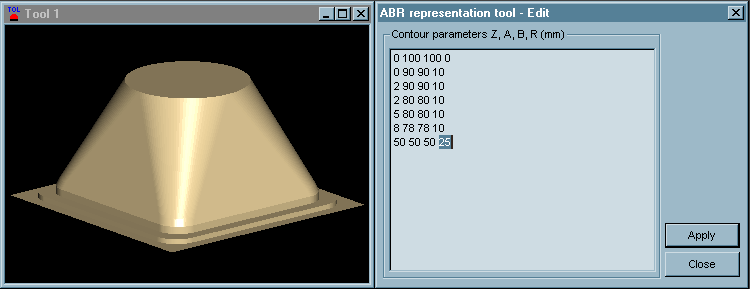
In this case, the radius of the latest contour was modified from 2 to 25 mm. Click on Apply to see the impact of the specified modification. It is possible to continue with modifications or to close the dialog. After closing, the modified tool can be saved using File / Save or File/ Save as command.
Every tool created using "ABR" editor remains editable until it is transformed, centered or mirrored. From this moment, the tool is no longer editable.
Creating new tool using import from STL / DXF / Patran / VRML / HyperMesh ASCII
DXF Import
T-SIM translates only 3DFACE entity while importing data stored in DXF
file. So the DXF file must contain such entities to describe a tool
surface. Wire-frame model of a tool cannot be read by T-SIM. It is necessary
to create surface model.
STL (stereolithography)
Import
T-SIM can use tool representation which were created using CAD/CAM software
packages like SurfCam, CATIA, ProEngineer, CadKey etc. Usually, such
a 3D upper tool shape is more complicated than simple geometrical shape
which can be created directly using T-SIM built-in upper tool editor.
In case your CAD system for generating of 3D tools does not have STL
output, use a software converter from IGES or VDA-FS files to STL file.
There is an increasing number of such a software converters from one
type of the 3D representation to the STL files. (E.g. for PC : SurfCam,
MasterCam, CadKey ...)
T-SIM can handle directly stereolithographic (STL) format of the exported files for a tool. The STL files can be read by T-SIM when meeting following conditions:
Patran Import This menu item enables import any tool shape saved in Patran format.
VRML Import Imports geometry from VRML file. Only VRML V2.0 is supported. Used mainly for simulation of Image pre-distortion using VRML files.
HyperMesh ASCII Import Imports geometry from HyperMesh ASCII file. Only *tria3 and *quad4 entities are recognized by the importing routine.
Transformations
To open a tool to transform - click on the icon with the tool tip "Open tool" and in Windows File Open dialog, browse for the tool file. Once the file is selected, click Open. A new window with the picture of the selected tool appears. Now, select command Tool / Move, Tool / Scale or Tool / Rotate to move, scale or rotate the selected tool.
Tool / Move:
Moves the tool into a new position. The distance of the new position
from original position is given by a vector with coordinates x, y, z.
This command displays following dialog box:
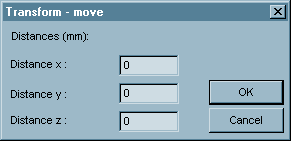
Enter the distances in direction of axis x, y and z.
Click OK to confirm the transformation. Click Cancel to cancel the dialog.
Tool / Scale:
Scaling of the tool in given direction. This command displays following dialog box:
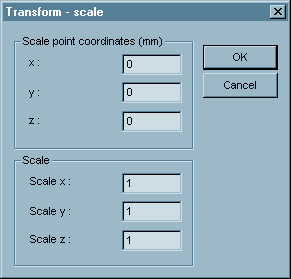
In Scale point enter coordinates of point to scale about.
In Scale enter scale in axis x, y and z.
Click OK to confirm the transformation. Click Cancel to cancel the dialog.
Tool / Rotate:
Rotate the tool around the given axis with given angle of rotation.
This command displays following dialog box:
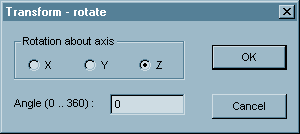
Select the axis about which the rotation should be performed.
Enter the angle of rotation.
Click OK to confirm the transformation. Click Cancel to cancel the dialog.
Centering, mirroring
To open a tool to center or mirror - click on the icon with the tool tip "Open tool" and in Windows File Open dialog, browse for the tool file. Once the file is selected, click Open. A new window with the picture of the selected tool appears.
To center the tool, click on Tool / Center command. A message box saying "Move tool center [x,y] to [0,0] ?" appears on the screen. Click Yes to center the tool. After centering, the tool should be save using command File / Save or File / Save as.To mirror the tool, click on Tool / Mirror(x) command. The tool will be automatically mirrored using a mirror plane x = (tool x min), where (tool x min) is the minimal x tool coordinate. After mirroring, the tool should be save using command File / Save or File / Save as.
Sometimes, some areas of a tool are not needed for the
simulation or these areas cause improper results, not corresponding
to the reality. In such a case, it is possible to remove faces from
tool. Cut tool command from Tool menu displays Cut tool (remove
faces) dialog:
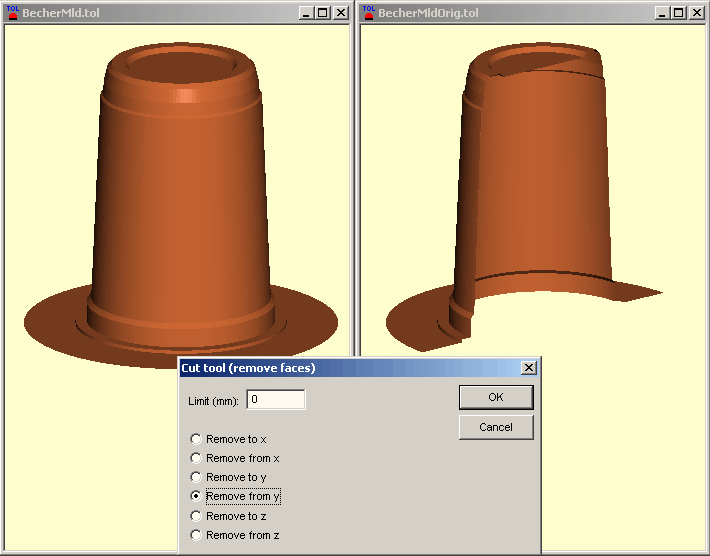
The figure above shows original tool on the right and modified tool on the left. Cut tool dialog shows the data used for faces removal. In this particular case, faces (triangles) with all nodal coordinates y greater than 0 (limit) were removed. Other faces were cut (in case they cross the dividing plane) or left unchanged (in case they do not interfere with the dividing plane).
Every tool can be exported in DXF format. To open a tool
for export, click on the icon with the tool tip "Open tool"
and in Windows File Open dialog, browse for the tool file. Once the
file is selected, click Open. A new window with the picture of the selected
tool appears. Now, click on Tool / DXF export.
In Windows File Save As dialog, specify a DXF file name and click Save.
The DXF representation of the T-SIM tool will be created.
Any 3D tool stored in T-SIM Tool file format (TOL), STL, DXF, VRML, Patran or HyperMesh ASCII file can be appended to the actually open tool.
T-SIM Tool viewT-SIM Tool view is a window enabling to display and perform modifications of tools A tool is displayed in T-SIM Grid view after creation or after opening:
To open the tool - click on the icon with the tool tip "Open tool" and in Windows File Open dialog, browse for the tool file. Once the file is selected, click Open. A new window with the picture of the selected tool appears:
T-SIM Tool view allows to: